How to Extend Umbraco v7 with a Custom Tree Menu Item and MVC API - Part 2
Wednesday 14th May 2014, 21:07
4.1 Creating an MVC API to do Something
Continuing on from Part 1 (where we got as far as creating the custom menu item in the Umbraco backend) I want to create an MVC API to service our Run Import button. First create a Models folder under the root of our project – again you might need to use Windows Explorer.
4.2 Create our API Model
Create an UmbExtend.cs file under the Models directory (for some reason this folder doesn't exist in the default Umbraco install? - ahh I only created an empty web project NOT an MVC one!) Note how our namespace is suffixed with APIController this is important!
We'll create two classes – Product and ImportProducts.
using System;
using System.Collections.Generic;
using System.Linq;
using System.Web;


namespace UmbExtendAPIControllerProject.Models
{
	public class Product
	{
		public int Id { get; set; }
		public string Name { get; set; }
		public decimal Price { get; set; }
	}

	public class ImportProducts
	{
		public DateTime LastUpdate { get; set; }
		public string Results { get; set; }
	}
}
4.3 Create our API Controller
Again first we need to create a Controller folder. Create a controller file in here called UmbExtendApiController.cs – note ensure the inheritance is to UmbracoApiController and it *must* be suffixed ApiController.cs! You might need to resolve this to Umbraco.Web.WebApi and the Product to the model class you just created and the ActionResult to use System.Mvc.Web.
In this we're going to have a method GetTestImportProducts. For now it's just going to return a results string and a last update date and time. We'll wire up the products later.
using System;
using System.Collections.Generic;
using System.Linq;
using System.Net;
using System.Web;
using System.Web.Http;
using UmbExtendAPIControllerProject.Models;
using Umbraco.Web.WebApi;


namespace UmbExtendAPIControllerProject.Controllers
{
	public class UmbExtendApiController : UmbracoApiController
	{
		ImportProducts myImportProducts = new ImportProducts();
		Product[] products = new Product[]
		{
			new Product { Id = 1, Name = "Laptop XYZ", Price = 12.99M },
			new Product { Id = 2, Name = "Widgets", Price = 9.99M },
			new Product { Id = 3, Name = "Dooberies", Price = 1.99M }
		};

		public ImportProducts GetTestImportProducts()
		{
			myImportProducts.LastUpdate = DateTime.Now;
			myImportProducts.Results = "Hello World - this is the result of the importer!";
			return myImportProducts;
		}

		// the following methods are from the Umbraco video examples - I've left them here for
		// reference
		/* public IEnumerable<Importer> GetAllImport()
        {
            return myImportProducts;
        }

        public Product GetProductById(int id)
        {
            var product = products.FirstOrDefault((p) => p.Id == id);
                if (product == null)
                {
                    throw new HttpResponseException(HttpStatusCode.NotFound);
                }
            return product;
        } */
	}
}
Ensure these files are included in your Project (if the icon in Visual Studio is greyed out then right click and Include in Project.
Now build your project and browse in Google Chrome http://localhost:57601/Umbraco/Api/UmbExtendAPI/GetTestImportProducts changing the local host port to match your Visual Studio lottery numbers.

API Response
What you'll see here is an XML document. This is because that is what Chrome has requested – if you perform the same test in IE you'll get a JSON response. The Umbraco controller is doing the hard work here for us!
4.4 Create our API Controller
Now if we rewire up the backoffice menu button to use this new API we've created we're most of the way there.
Let's change the umbExtend.umbExtendtree.import.controller.js file to use the new API (and modify the data field it's looking for from content to Results.
$http.get('http://localhost:57601/Umbraco/Api/UmbExtendAPI/GetTestImportProducts').
			success(function (data) {
				$scope.importOutput = data.Results;  // case sensitive!
			});
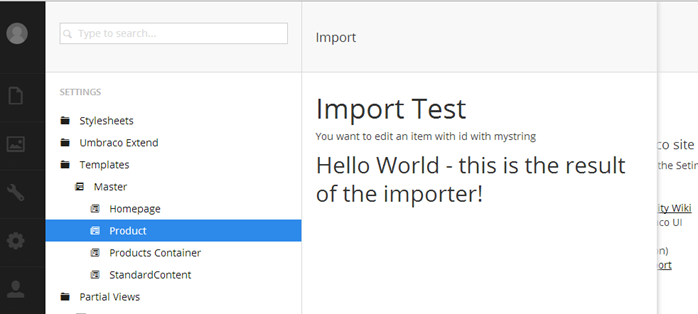
Viola – we now have our button in the Umbraco back office calling our custom MVC API toolkit. The world is now your lobster. Now we can import from third party systems by creating our custom methods in the API MVC.

Calling our API from the Umbraco Custom Back Office Button
I'd suggest that this example is built upon to provide a "Please wait" AJAX spinner and show the user something is happening if you're planning to do something intensive in the API call. It would probably be a good idea to hide the Run Import! Button so that the user doesn't accidently click it. In the next example this has been included.
Conclusions on part 2
Now have our custom tree item Import calling our MVC Umbraco API. It still doesn't do anything meaningful yet. We'll extend the API in my next blog post.
Code
You can download a copy of the completed code from the next part of the tutorial.
Comments
If you spot any typos or issues with this tutorial please email me  steve@SiempreSolutions.co.uk
Next - Extending Umbraco with a Custom Tree and MVC API - Part 3
In my next blog post we enhance the MVC Umbraco API top actually pickup products from a third-party system and create these as content items in Umbraco.
Siempre Solutions Limited is a company registered in England and Wales with company number 09019307


