


How to Extend Umbraco v7 with a Custom Tree Menu Item and MVC API - Part 1
Wednesday 14th May 2014, 21:07
1 Introduction
Want a button that imports new products into Umbraco - or for anything else?
The documentation for extending the Umbraco backend is currently a bit mixed up with pre Version 7 stuff and some early posts in areas that have changed as version 7 matured. I've a task to add a button to the settings section in the Umbraco backoffice which will allow the editor users to perform a products import from their third party stock system. In this example I'm going to try and use the latest Umbraco methods – namely Angular JS for the backend and MVC API for the integration. I'd be very interested in any feedback or opinions on the approach taken – I've worked through the documentation and various examples and I think this is aligned with the recommended approach.
Please note - there are lots of simplifications in the example code (e.g. no error handling and no security), it's more intended to be a starter for ten rather than production ready code.
2 What You'll Need
To take you through a demo of extending Umbraco you need the following:
- A clean installation of Umbraco in Visual Studio use the latest main 7.1.X download via NuGet. Follow the installation steps in the documentation http://our.umbraco.org/documentation/installation/install-umbraco-with-nuget
- This is optional, but I like to give myself a homepage so I create a Homepage with a master template and use the Initializr template https://github.com/verekia/initializr-template/archive/master.zip.
3 Creating a Custom Tree
3.1 Introduction
I've named my plugin UmbExtend – if you wish you can name it whatever you like but take care to retain the case from the examples as I'm led to believe it can cause issues. Also ensure that you leave references to "Tree" or "Controller" in the code samples as these naming conventions are important for Umbraco and are not just my names for the namespaces and classes.
To start create a blank Visual Studio project and use NuGet to get Umbraco. I used version 7.1.2.
Follow the guide here if you're unsure how to do this. http://our.umbraco.org/documentation/installation/install-umbraco-with-nuget
To give myself a homepage I create a Homepage with a master template and use the Initializr template. http://www.initializr.com/
3.2 Add a TreeController
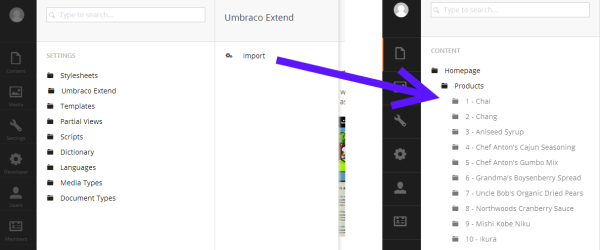
Our first task is to add a custom tree to the Settings menu. I only really need a button but it will be cleaner to add a new tree (even if this only has one node – the root) and to place all of my custom tools here. This example is only going to create a button – there is no edit / create screen which would control the creation of child nodes – refer to the UKFest Angular JS Demo with the notes on the forum if you wish to do this.
Create a TreeController c# file in the /App_Code/ folder. Name the file "UmbExtendTreeController.cs". You may need to show all files in Visual Studio to see this folder.
Note the addition of the id parameter in the CreateTreeNode calls and the modification of the MenuItemCollection method from the UKFest example - this changed from v7.0 to v7.1 I believe.
using System;
using System.Collections.Generic;
using System.Linq;
using System.Net.Http.Formatting;
using System.Web;

using Umbraco.Core;
using Umbraco.Web.Models.Trees;
using Umbraco.Web.Mvc;
using Umbraco.Web.Trees;


/// <summary>
/// Summary description for UmbExtendTreeController
/// </summary>

[Tree("settings", "umbExtendTree", "Umbraco Extend")]
[PluginController("UmbExtend")]
public class UmbracoExtendTreeController : TreeController
{
    protected override TreeNodeCollection GetTreeNodes(string id, FormDataCollection queryStrings)
    {
        // check if we're rendering the root node's children
        if (id == Constants.System.Root.ToInvariantString())
        {
            // empty tree
            var tree = new TreeNodeCollection();
            // but if we wanted to add nodes -
            /*  var tree = new TreeNodeCollection
            {
                CreateTreeNode("1", id, queryStrings, "My Node 1"),
                CreateTreeNode("2", id, queryStrings, "My Node 2"),
                CreateTreeNode("3", id, queryStrings, "My Node 3")
            };*/
            return tree;
        }
        // this tree doesn't support rendering more than 1 level
        throw new NotSupportedException();
    }


    protected override MenuItemCollection GetMenuForNode(string id, FormDataCollection queryStrings)
    {
        // create my menu item "Import"
        var menu = new MenuItemCollection();
        // duplicate this section for more than one icon
        var m = new MenuItem("import", "Import");
        m.Icon = "settings-alt";
        menu.Items.Add(m);

        return menu;
    }
}
Figure 1 - /App_Code/UmbExtendTreeController.cs
Some points of note:
- Note the "Attribute" before the class definition for Tree. This states that Umbraco should create this tree in the settings menu and it will have the internal name UmbExtendTree followed by a more friendly name / label for the editors.
- The second attribute names the PluginController that Umbraco will look for in the App_Plugins directory (we'll add this soon).
3.3 Create an Import Controller
Now we need to add a Controller to handle our Import menu item. In the Umbraco documentation they state that these are automatically picked up if they are put next to the view – in practice it seems this is not actually the case (perhaps I just can't find the correct naming convention?) and we need to add a package.controller file (see next section). I'll follow the naming conventions to match the Umbraco documentation though. You may need to open App_Plugins folder in Windows Explorer to add the necessary folder structure.
/App_Plugins/umbExtend/BackOffice/umbExtendTree/umbextend.umbextendTree.import.Controller.js
'use strict';
(function () {
    //create the controller
    function umbExtendImportController($scope, $routeParams, $http) {
        //set a property on the scope equal to the current route id
        $scope.id = $routeParams.id;
        $scope.test = "mystring";
        $scope.importOutput = "";


        $scope.runImport = function (importID) {
            console.log("I have called our REST API");

            // here is where we call our Import REST API
            // $scope.importOutput = "Run Successfully!"

            $http.get('http://localhost:57601/App_Plugins/UmbExtend/jsontest.html').
            success(function (data) {
                $scope.importOutput = data.content;
            });
        }

    };
    //register the controller
    angular.module("umbraco").controller('UmbExtend.UmbExtendTree.ImportController', umbExtendImportController);

})();
Figure 2 - /App_Plugins/UmbExtend/BackOffice/umbExtendTree/umbextend.umbextendTree.import.Controller.js
Change the http.get line to match the port that your Visual Studio random number generator has chosen (one day I'm going to look up how it decides on this).
3.4 Create a Package Manifest
The documentation states that placing the controller next to the view will load it – I tried all sorts of file names and changes and couldn't get it to work. I think the v7.1 standard practice is to add it via a package.manifest file in your /App_Plugins/UmbExtend/ directory. This tells Angular where it can get your controllers.
{
	javascript: [
	    '~/App_Plugins/UmbExtend/BackOffice/umbExtendTree/umbExtend.umbExtendTree.import.Controller.js'
		]
}
Figure 3 - /App_Plugins/UmbExtend/package.mainifest
3.5 Create an Import view file
Now we need to create the import.html page that will be displayed inside Umbraco in the right hand pane when the user clicks on the Import button. Create this in /App_Plugins/UmbExtend/BackOffice/umbExtendTree/ This may feel like you have to create a lot of folder structure to do something simple but it lays the foundation to allow for much more complex custom tree sections.
<div ng-controller="UmbExtend.UmbExtendTree.ImportController">
    <div class="umb-pane">
        <h1>Import Test</h1>
        <p>
            You want to edit an item with id {{id}}  with {{test}}
        </p>
        <h2>{{importOutput}}</h2>
        <div class="btn-toolbar pull-right umb-btn-toolbar">
            <a href class="btn btn-primary" ng-click="runImport(99)" prevent-default>Run Import !</a>
        </div>
    </div>
</div>
Figure 4 - /App_Plugins/UmbExtend/BackOffice/umbExtendTree/import.html
3.6 Add the test JSON Response
Finally we add a dummy JSON Response. Eventually we'll make this example call an MVC powered API that you can write to perform some action (for me it's going to be a product import) but for now let's test our backoffice custom tree and button.
Create the following file as a .html file - note - you wouldn't normally serve JSON up from a .html file – this is just for a quick and dirty hack for testing.
{"id":541,"content":"Hello World!"}
Figure 5 - /App_Plugins/UmbExtend/jsontest.html
3.7 Testing
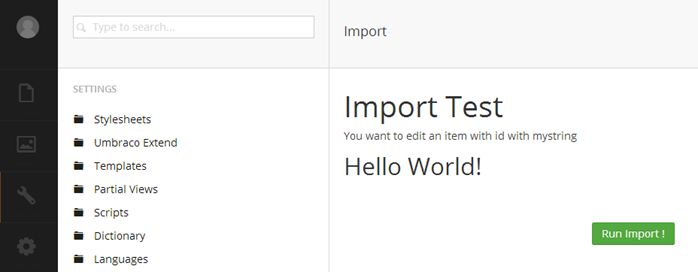
Figure 6 - Hello World Response
If you've got everything right then you should now be able to run Umbraco and browse the Settings menu – you'll find Umbraco Extend as a menu option (second one down - there is an index value you can change). Clicking on the + symbol will open the menu with our Import command. Hit this and you'll see our import.html screen. Running the Run Import button will return our dummy JSON response!
3.8 Fixing any Problems
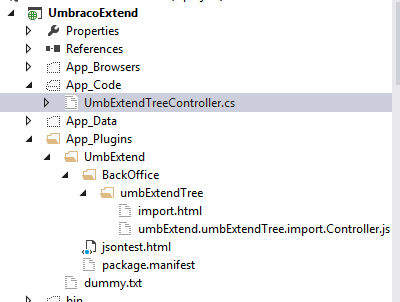
Figure 7 - Project Structure
If something isn't working check that the text in your Import Menu looks like that above (e.g. the Angular fields are replaced by the text in the Contoller) – if you have any curly braces your controller isn't being picked up, also you should see a "Hello World" response – also check for errors in the browser debugging tools. Issues here are usually around the package.manifest file – also check that everything is included in your project.
Your file structure should look like that above.
Conclusions on Part 1
There we are - we now have a custom tree item in the Umbraco backoffice - it doesn't do anything yet.
Code
Here you can download a copy of the code from the tutorial. Simply copy these files into an Umbraco Visual Studio project (take note of the folder structure and ensure that they are added to the project).
 Download Code Sample - umbExtend.zip
Comments
If you spot any typos or issues with this tutorial please email me  steve@SiempreSolutions.co.uk
Next - Extending Umbraco with a Custom Tree and MVC API - Part 2
In my next blog post we take what we've built here and ensure wire up a MVC Umbraco API to the button.

Siempre Solutions Limited is a company registered in England and Wales with company number 09019307