


Umbraco v7 Members' Area with Protected Content - Part 3 - Members MVC - Full Solution Tutorial
Wednesday 27th April 2016, 10:43
1 Introduction
Two years ago (how time flies!) I last wrote a blog post on how to create a Members Surface Controller to allow for a Members’ section on websites in Umbraco. The tutorial was deliberately simple and wasn’t feature complete. It gets a lot of traffic and the odd comment and I think it’s about time I did the final step to add some of the standard functionality that websites require – e.g. validating the user’s email before allowing login, adding a forgotten password function and sending the necessary emails. As with all code - this is just the way I do it – there might be better ways, I’d be keen to hear them though!
Updates
Following writing this the Umbraco community provided a few pointers and corrected a few mistakes!
- Update: 27/04/2016: Thanks to Sebastiaan Janssen for a few code improvements and recommending the already registered email method
- Update: 27/04/2016 (2): Thanks to Andy Butland for the CSRF recommendations
- Update: 27/04/2016 (3): Added the missing Edit Profile code - note you can't edit the username / email. This is left as a user exercise, I'd recommend it's a separate form and you log the user out and send them a validation email to ensure the email is valid
 Download The Source Code
Features:
- Registration form
- Sends a validation email
- Login form
- Logout
- Forgotten Password functionality
2 Install Unobtrusive Validation
This example uses the jQuery dependant Ubobtrusive validation – I often leave this out as I find it a bit annoying. But to install it in your project run the Nuget command
Install-Package Microsoft.jQuery.Unobtrusive.Validation
Then just add to your master template near the closing body tag:
    <script src="~/scripts/jquery-1.8.0.min.js"></script>
    <script src="~/scripts/jquery.validate.min.js" type="text/javascript"></script>
    <script src="~/scripts/jquery.validate.unobtrusive.min.js"></script>
</body>
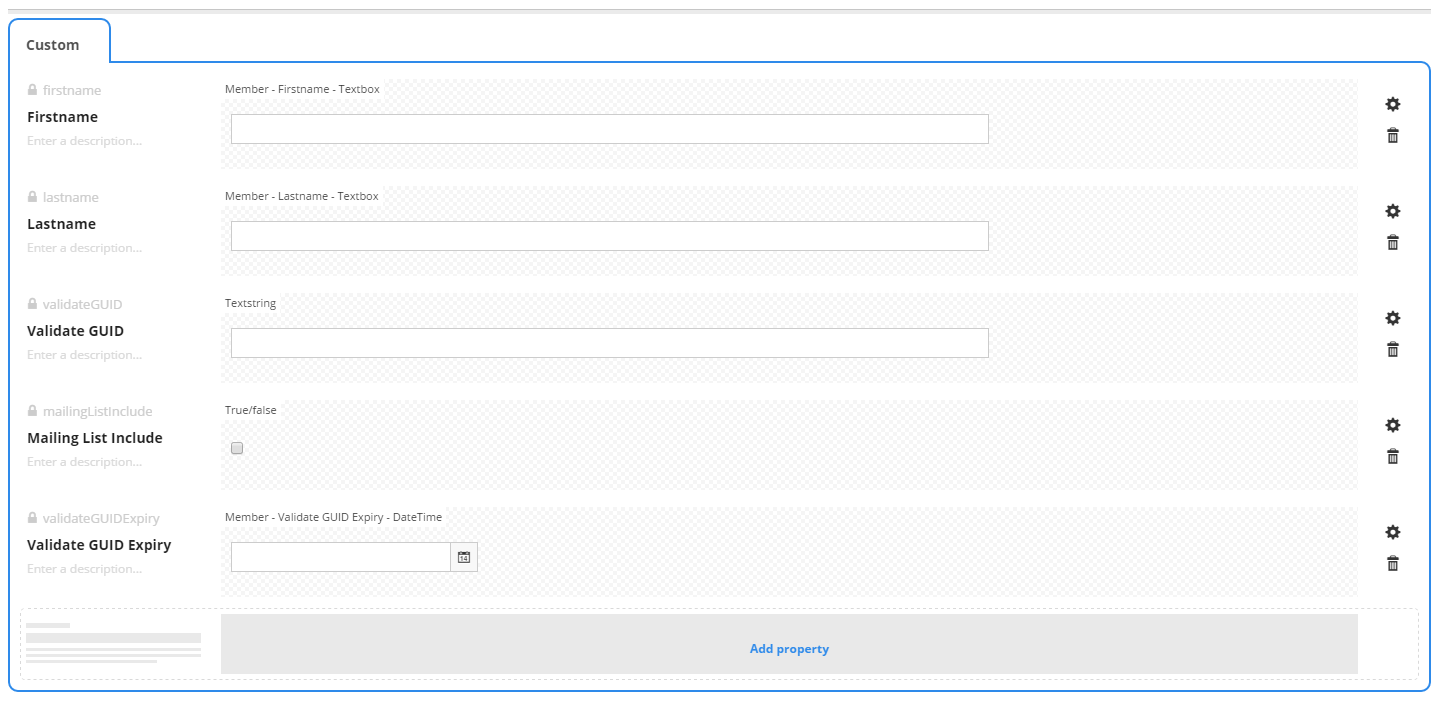
3 Custom Data Properties on the Member
Add the following custom properties to the member (Members > Member Types > Member ). Note the different data type (e.g. textbox, true /false and DateTime). The validate GUID expiry date time field will allow us to create links for emails that will expire (e.g. for forgotten passwords).
4 Adding the Doc Types
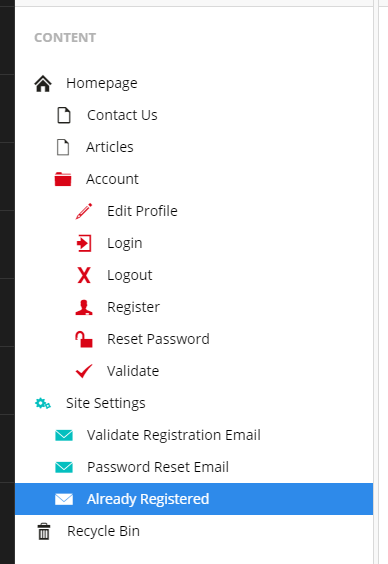
Add the following doc types (with a template);
For the account processes;
- Edit Profile
- Login
- Logout
- Register
- Reset Password
- Validate
For the emails (without templates);
- Email Template
- Site Settings (this is just my standard place for site wide settings, placed directly under the homepage).
Add the necessary permissions and create the content nodes so that your content tree matches something like the structure below – you’ll note I’ve put all the account nodes under an Account node and a Reset Password, Register child and Already Registered Email Template node underneath the Site Settings. If you name the nodes differently you may need to adjust some hard coded paths.
The Already Registered email is used so that we don't show users error messages if they use an email address that is already tied to a member account. This is to protect user's privacy - instead that user receives an email (so that if they have forgotten they've already registered they know to just log in or reset their account) - thanks to Sebastiaan Janssen for recommending I add this as per this blog post.
Site Settings
I tend to always add a site settings node (either at the root level to keep it away from the content or for multilingual sites just under the homepage node. When you create this take a note of the ID of the node (you can get this from the Properties tab).
You’ll need to update line 21 of the /Helpers/Emalhelper.cs file to "get" the correct node by ID (yours is unlikely to also be 1074!).
In the Site Settings doctype I’ve created a multi-line text field (called a text area now) property called “Email Master Template”. I’ve inserted the email template markup from http://leemunroe.github.io/responsive-html-email-template/email.html - the only thing I’ve changed is to remove the content between the content comments (lines 188-215 at time of writing) and replaced it with a [[CONTENT]] field that I use to replace the email body with (which is different depending on the email being sent, I also remove the unsubscribe link (we’re only sending emails the user needs – a Mailchimp integration would be recommended to do the mailing list subscription).
<!doctype html>
<html>
<head>
<meta name="viewport" content="width=device-width">
<meta http-equiv="Content-Type" content="text/html; charset=UTF-8">
<title>Really Simple HTML Email Template</title>
<style>
/* -------------------------------------
    GLOBAL
------------------------------------- */
* {
  font-family: "Helvetica Neue", "Helvetica", Helvetica, Arial, sans-serif;
  font-size: 100%;
  line-height: 1.6em;
  margin: 0;
  padding: 0;
}
img {
  max-width: 600px;
  width: auto;
}
body {
  -webkit-font-smoothing: antialiased;
  height: 100%;
  -webkit-text-size-adjust: none;
  width: 100% !important;
}
/* -------------------------------------
    ELEMENTS
------------------------------------- */
a {
  color: #348eda;
}
.btn-primary {
  Margin-bottom: 10px;
  width: auto !important;
}
.btn-primary td {
  background-color: #348eda;
  border-radius: 25px;
  font-family: "Helvetica Neue", Helvetica, Arial, "Lucida Grande", sans-serif;
  font-size: 14px;
  text-align: center;
  vertical-align: top;
}
.btn-primary td a {
  background-color: #348eda;
  border: solid 1px #348eda;
  border-radius: 25px;
  border-width: 10px 20px;
  display: inline-block;
  color: #ffffff;
  cursor: pointer;
  font-weight: bold;
  line-height: 2;
  text-decoration: none;
}
.last {
  margin-bottom: 0;
}
.first {
  margin-top: 0;
}
.padding {
  padding: 10px 0;
}
/* -------------------------------------
    BODY
------------------------------------- */
table.body-wrap {
  padding: 20px;
  width: 100%;
}
table.body-wrap .container {
  border: 1px solid #f0f0f0;
}
/* -------------------------------------
    FOOTER
------------------------------------- */
table.footer-wrap {
  clear: both !important;
  width: 100%;
}
.footer-wrap .container p {
  color: #666666;
  font-size: 12px;

}
table.footer-wrap a {
  color: #999999;
}
/* -------------------------------------
    TYPOGRAPHY
------------------------------------- */
h1,
h2,
h3 {
  color: #111111;
  font-family: "Helvetica Neue", Helvetica, Arial, "Lucida Grande", sans-serif;
  font-weight: 200;
  line-height: 1.2em;
  margin: 40px 0 10px;
}
h1 {
  font-size: 36px;
}
h2 {
  font-size: 28px;
}
h3 {
  font-size: 22px;
}
p,
ul,
ol {
  font-size: 14px;
  font-weight: normal;
  margin-bottom: 10px;
}
ul li,
ol li {
  margin-left: 5px;
  list-style-position: inside;
}
/* ---------------------------------------------------
    RESPONSIVENESS
------------------------------------------------------ */
/* Set a max-width, and make it display as block so it will automatically stretch to that width, but will also shrink down on a phone or something */
.container {
  clear: both !important;
  display: block !important;
  Margin: 0 auto !important;
  max-width: 600px !important;
}
/* Set the padding on the td rather than the div for Outlook compatibility */
.body-wrap .container {
  padding: 20px;
}
/* This should also be a block element, so that it will fill 100% of the .container */
.content {
  display: block;
  margin: 0 auto;
  max-width: 600px;
}
/* Let's make sure tables in the content area are 100% wide */
.content table {
  width: 100%;
}
</style>
</head>

<body bgcolor="#f6f6f6">

<!-- body -->
<table class="body-wrap" bgcolor="#f6f6f6">
  <tr>
    <td></td>
    <td class="container" bgcolor="#FFFFFF">
[[CONTENT]]
    </td>
    <td></td>
  </tr>
</table>
<!-- /body -->

<!-- footer -->
<table class="footer-wrap">
  <tr>
    <td></td>
    <td class="container">

    </td>
    <td></td>
  </tr>
</table>
<!-- /footer -->

</body>
</html>
5 Email Templates
In the Email Template doc type there is a text area property called Email Body and a text string called Email Subject.
You need an email template under the Register and the Reset Password nodes. You may prefer to have these under the site settings – I think it makes more sense for editors to have the email on the page that the email is sent from.
Validate Registration Email
<!-- content -->
      <div class="content">
      <table>
        <tr>
          <td>
            <p>Hi [[FIRSTNAME]],</p>
            <p>Thank you for registering with This Website.</p>

            <p>To complete your registration please click on the following link to validate your email:</p>

            <h4><a href="http://[[DOMAIN]]/account/validate?email=[[EMAIL]]&validateGUID=[[VALIDATEGUID]]">http://[[DOMAIN]]/my-account/validate?email=[[EMAIL]]&validateGUID=[[VALIDATEGUID]]</a></h4>

            <p>Thanks</p>
            <p>Website Owners</p>
          </td>
        </tr>
      </table>
      </div>
      <!-- /content -->
Password Reset Email
<!-- content -->
      <div class="content">
      <table>
        <tr>
          <td>
            <p>Hi [[FIRSTNAME]],</p>
            <p>Someone requested a password reset on the WEBSITE .</p>

            <p>To complete the password reset please click on the following link:</p>

            <h4><a href="http://[[DOMAIN]]/account/reset-password?email=[[EMAIL]]&validateGUID=[[VALIDATEGUID]]">http://[[DOMAIN]]/my-account/reset-password?email=[[EMAIL]]&validateGUID=[[VALIDATEGUID]]</a></h4>

            <p>Thanks</p>
            <p>Website Owners</p>
          </td>
        </tr>
      </table>
      </div>
      <!-- /content -->
Already Registered
<!-- content -->
      <div class="content">
      <table>
        <tr>
          <td>
            <p>Hi [[FIRSTNAME]],</p>
            <p>Someone, hopefully you, has tried to register on This Website.</p>

            <p>If it was you we already have an account. Please try logging in using this address. If you've forgotten your password then you can reset it using the link below.</p>

            <h4><a href="http://[[DOMAIN]]/account/reset-password">http://[[DOMAIN]]/account/reset-password</a></h4>

            <p>Thanks</p>
            <p>Website Owners</p>
          </td>
        </tr>
      </table>
      </div>
      <!-- /content -->
6 Adding the Code
Copy in the Controllers/Account, Helpers and Models/Account files – include these in your solution and build your solution. Remember to change the site settings ID in the email helper file. In your template views for the doc types created in step 1 add the corresponding action to render the form in the desired place from the new Surface Controllers (or just copy the views from the code I've provided).Edit Profile:
@Html.Action("MemberEditProfileRenderForm", "MemberEditProfileSurface")
Login:
@Html.Action("MemberLoginRenderForm", "MemberLoginSurface")
Register:
@Html.Action("MemberRegisterRenderForm", "MemberRegisterSurface")
Reset Password:
- See the code in the repository as there is some logic here.
Validate
@Html.Action("MemberValidate", "MemberValidateSurface")
7 Conclusions
And that is it!
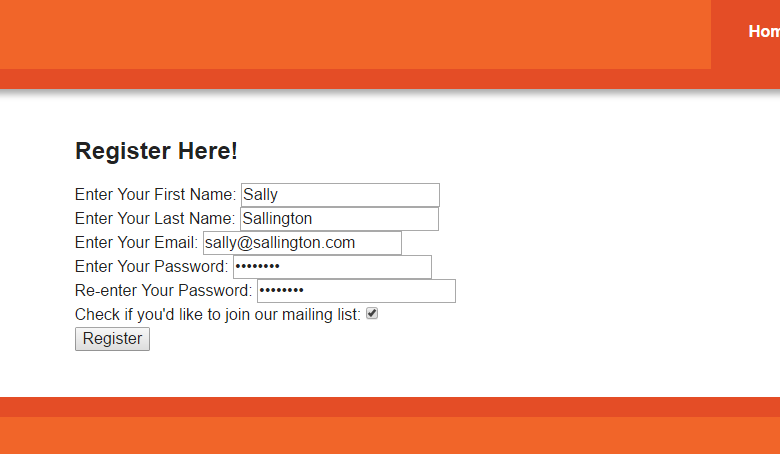
Try now hitting the register page and register a user. Ensure you can register, login, log out and reset your password!
Now you just need to add the various links to the desired place in your menu / header etc
If you get any errors check you've correctly named the custom properties on the member, you've remembered to update the Site Settings node ID in the code and you've named the email template nodes *exactly* as per the example above!
Any comments, suggestions for improvements very welcome!
Comments
If you spot any typos or issues with this tutorial please leave a comment below or email me  steve@SiempreSolutions.co.uk

Siempre Solutions Limited is a company registered in England and Wales with company number 09019307